When you go to an exhibition of photographs, what type of photo always seems to be one remembered? It’s the sweeping panorama.
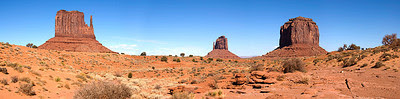
Panoramas of a scene seem to take the image to new heights. They make landscapes more dramatic and vivid. Mountains become more majestic. Horizons become more exciting. Even a panoramic style view of great architecture becomes more admirable. The above panorama, made from five photographs stitched together, taken in Monument Valley, far better represents the feeling one gets traveling among the Valley’s natural wonders than squarish photographs.
We’re used to seeing photographs in the typical 3:2 aspect ratio of width to height which started with the invention of the 35mm film format, and is carried through on today’s digital cameras, both the
DSLR’s and
Point & Shoot varieties. The most common print sizes of 5x7, 8x10, and 11x14, generally adhere closely to the squarish 3:2 ratio.
I think that part of the reason panoramas so appeal to the eye is their departure from the 3:2 format, and the easy way they draw your eye across their “canvas.” The appeal of
Cinemascope, the first widely accepted “wide” movie format, is much the same. Cinemascope allowed movies to go to a 2.66:1 aspect ratio, twice as wide as the conventional format of 1.33:1. With Cinemascope, the breathtaking beauty of the background of some of the classic movies of the 50’s and 60’s and beyond was greatly enhanced.
Imagine what “Ben Hur” or “Lawrence of Arabia” would look like, reduced to a square screen. Without their wide screen aspect ratio, in my opinion, neither of these films would have won an Oscar for “Best
Cinematography.”
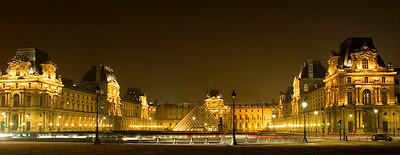
You don’t have to limit your panoramas to landscapes, though they are the most familiar use of the wide aspect ratio photograph. Buildings, city-scapes, groups of people, and parades are all great subjects for panoramas. Isn’t this photograph of the Louvre in Paris at night made more dramatic by its wide aspect ratio?
There are two basic methods for producing a panorama photograph. The easiest way is to take a wide angle view of your subject and crop it to produce an image with a wide aspect ratio. This is how I produced the photograph of the Louvre above.
Some Point and Shoot digital cameras have a “Panorama Mode.” If your camera has one, use it. It will enable you to get some spectacular results with some practice.
The other method for creating a panorama photograph is to take several photos of your subject, moving your camera across the subject, being careful to overlap each shot, then stitch them together with an image editor on your computer. Both Photoshop and Photoshop Elements contain tools to stitch photos together, or you can use specialized software to accomplish this task. I use PanaVue Image Assembler for my multi-image panoramas. It allows me excellent control in creating the combination image.
While you can hand hold your camera to take multiple photographs stitched together into a panorama, I strong suggest you use a tripod. Using a tripod allows you to easily keep each photo in the panorama in the same horizontal plane. I use a special panorama head on my tripod for these shots, which makes leveling the tripod easier, and helps you rotate your camera a specific number of degrees between each photo.
While you’re looking horizontally to produce panoramas, there may be some opportunities for vertical panoramas too. Don’t loose sight of these vertical possibilities.
Don’t forget the “
Rule of Thirds” when taking panoramas.
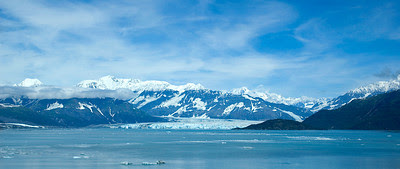
Take my word for it, or try it yourself. Placing the bay’s horizon in the lower third of this photo of the Hubbard Glacier in Alaska, close to the intersection of the lower third with the middle third, made this panorama much more pleasing to the eye, than if I placed the bay’s horizon across the middle of the photograph.
In
Panorama Photography Part II, I will discuss techniques for taking your photographs for multiple image stitched panoramas.

 As Thursday night becomes Friday morning this week, we’ll go from New Years Eve to New Years Day. Across much of the country that means fireworks.
 The Art Institute of Chicago, regularly has extraordinary photographic exhibitions. This exhibition,
 The Getty Museum in Los Angeles has one of the great photographic collections in the world. This exhibition of 40 prints of men, women, and children working include a range of photographic processes from daguerreotypes to gelatin silver prints.This exhibition,
  It's the holiday time of the year, time to think about gifts for friends and family who include photographers; beginners, through serious amateurs.
 The Florida Museum of Photographic Arts holds some of the best photographic exhibitions in the southern United States. Their current exhibition,
  I remember the big “Payola” scandals in the record industry of the 60’s. You may have lived through them yourself, or read about them in school. Record companies gave “promotional” payments to radio disc jockeys to play specific songs and give them ample air time in order to popularize them.
 The Royal Ontario Museum continually shows some of the best photographic exhibitions in North America. The Museum includes The Institute for Contemporary Culture. The Museum’s diverse collections of world cultures and natural history with almost 6 million objects make it one of the largest museums in North America.
  I don't know about you, but I like cruising. I've been on large ships and small. I also enjoy canoeing and rafting. Taking photographs from any of these craft can be a real challenge.
 Periodically the National Portrait Gallery has some incredible photographic portrait exhibitions.
  The Philadelphia Museum of Art has become one of the foremost exhibitors of fine art photography in the nation.
 It seems as though this is the year to recognize the incredible career of Irving Penn. This new exhibition by the Art Institute of Chicago,
  I don't know about your digital camera, but my Nikon D-200, a
DSLR, seems to eats up its battery charge too quickly. That's one of the major
reasons I have a vertical grip on my camera. The grip allows me to use two
batteries at a time, doubling battery life.
I don't know about your digital camera, but my Nikon D-200, a
DSLR, seems to eats up its battery charge too quickly. That's one of the major
reasons I have a vertical grip on my camera. The grip allows me to use two
batteries at a time, doubling battery life. The Museum of Photographic Arts in San Diego, CA,
continually has great photography exhibitions.
The Museum of Photographic Arts in San Diego, CA,
continually has great photography exhibitions.  The best photos taken are the photos which are carefully planned.
 MoMA, The Museum of Modern Art in New York City,
has exhibitions displaying some of the most interesting trends in contemporary
photography.
MoMA, The Museum of Modern Art in New York City,
has exhibitions displaying some of the most interesting trends in contemporary
photography. 
 The Getty Museum has become one of the premier museums exhibiting great works of photographic art.
 Before the advent of high quality digital cameras, professionals, and advanced amateur film photographers traditionally used
  The National Gallery of Art has an extensive collection of photographic images, however, most are not regularly on display. This exhibition,
  While traveling, or for that matter, during any photo shoot, for a variety of reasons, photographers may vary any number of major camera settings which control exposure metering, focus, shutter mode, etc. By the end of the day, one’s camera’s settings may be significantly different than when the day began.
 The Phoenix Art Museum periodically runs wonderful photographic exhibitions.
 The Museum of Contemporary Photography, in Chicago, IL has some of the most exciting exhibitions of contemporary photography in the US.
  When we travel we certainly see and often visit churches, temples, mosques, synagogues, and other religious shrines. Many contain some of the world’s great artwork. Many are architectural gems unto themselves. Many have extensive grounds. Many are important for their history, or their part in historic events.
 The Getty Museum in Los Angeles has one of the great photographic collections in the world. This exhibition shows of some of their most interesting works of scene setting, as opposed to natural settings.
 In the second article in the Series,
 The Philadelphia Museum of Art, in Philadelphia, PA, has recently been more creative in developing their photographic exhibitions.
  I’ve now discussed the benefits of using a tripod, and the general criteria you should use to compare potential tripod choices, to find one which meets your needs.
 The Whitney Museum of American Art in New York, New York, regularly has very special photographic exhibitions.
  The Victoria and Albert Museum in London, England periodically has wonderful photographic exhibitions.

 The Photographic Center Northwest, Seattle, Washington, is at the forefront in advancing the study, practice, and appreciation of fine art and documentary photography through education, exhibitions, and public programs. Their
 The Museum of Photographic Arts in San Diego mounts eight to ten major exhibitions per year that represent the history of the medium, contemporary works, photojournalism, and varied photographic processes. This is, in my opinion, the outstanding museum concentrating on the photographic arts in the US.
 The Museum of Fine Arts, Boston, periodically has terrific photographic exhibitions.


